How to Replace a Garage Door Opener? Can a single upgrade change daily safety and convenience for your home?
We answer that question with clear steps and calm expertise. We are Emerald Garage Door Services, a family-owned team serving Central Florida with 24/7/365 support. Our licensed, insured, and bonded technicians are background-checked and ready to help.
We outline a straightforward professional flow: cut power, mount rails, position the motor, align sensors, program remotes, and run stop-and-reverse tests. This reduces noise and prevents erratic stops caused by sensor misalignment.
We prioritize safety from the first minute and set clear expectations on timeline and outcomes. We explain when a DIY attempt makes sense and when you should call us for guaranteed workmanship and parts.
Key Takeaways
- We follow a proven installation flow that ensures smooth operation.
- Sensor alignment and level mounting prevent failures and noise.
- We offer 24/7/365 support and back work with a full guarantee.
- We help you compare features like quiet drive, battery backup, and app control.
- Our team is licensed, insured, bonded, and background-checked for your safety.
Before You Start: Safety First and What to Expect from This How-To Guide
Begin with safety checks so the rest of the job runs smoothly and without surprises. We always put your safety first. Disconnect power before touching any electrical components and secure the door in the up position if you must work under it.
Clear the workspace and gather tools, parts, and replacement hardware. Remove the old unit and set aside reusable accessories. Prepare rails, sensors, and controls for installation.
Expect clear, step-by-step guidance: removal, rail mounting, motor placement, sensor alignment, wiring, and final tests. We flag common trouble points—sensor misalignment, incorrect mounting, and loose hardware—so you can prevent poor performance.
- Typical timing and when a second pair of hands helps most.
- Tools and parts checklist that reduces backtracking.
- When visible damage or irregular movement means a broader system inspection.
If the project feels risky, call Emerald Garage Door Services for 24/7/365 help. Reach us at (407) 788-1229 or EmeraldGarageDoorServices@gmail.com for same-day support and guaranteed results.
Safety Risks and When to DIY vs Call a Professional
Certain parts hold stored energy that can cause serious harm if handled incorrectly. Torsion springs and high-tension cables store enormous force. We never recommend adjusting them without training and proper tools.
Electrical hazards are another major risk. Cut power at the breaker and unplug the unit before any wiring work. This prevents shocks and protects the motor and control parts during removal.
- Never touch torsion springs or cables; sudden release can cause severe injury.
- Use a second person for lifting the motor and rail assemblies and for ladder safety.
- Stop and call us if you see a sagging panel, frayed cables, or a motor that overheats.
- Structural issues—split header, bent track, or loose brackets—mean the project is more than an opener replacement and needs professional repair.
Even experienced DIYers miss slight sensor misalignment that causes stop-and-reverse errors. We handle old hardware carefully, protect finishes, and check parts for years of wear.
Your safety is our top priority. We are licensed, insured, bonded, and background-checked. Call (407) 788-1229 for 24/7/365 assistance and guaranteed parts and labor when the job is high risk.
Choosing the Right Garage Door Opener for Your Home
Picking the right unit makes daily life quieter and more reliable for your home. We balance noise, power, and smart features so your new garage fits life in Central Florida.
Drive choices: Chain drives are rugged and budget-friendly but louder. Belt and belt drive systems run quietly and suit attached living spaces. Direct or screw drives provide smooth motion with low upkeep and work well for many models.
Power and weight: Match motor capacity to door weight. A 1/2 HP unit fits most single-panel doors. Heavier or wood-overlay garage door panels often need 3/4 HP or greater for long life and steady performance.
- Smart features: Wi‑Fi, app control, HomeLink, and timer-to-close add security and convenience.
- Noise & backup: Battery backup keeps operations reliable during storms. Noise levels affect placement near living areas.
- Compatibility: We verify remotes, keypad pairing, vehicle buttons, and repeaters for older cars.
We compare models by noise, durability, and warranty. We install, program, and guarantee parts and labor, and provide a written estimate and timeline so you know what to expect before we start.
Tools, Parts, and Prep to Make the Job Smoother
A tidy workspace and pro-grade tools make installation faster and safer. We arrive ready with licensed equipment and replacement hardware if any parts are missing.
Essential gear includes a drill/driver, screwdriver set, open-ended wrenches, step ladder, level, eye protection, and gloves. These tools keep the crew efficient and the work safe.

- Make sure the power is off at the breaker and the unit is unplugged before touching wiring.
- Clear vehicles, bikes, and storage from the track area for unobstructed access.
- Inspect old garage door brackets, angle iron, and track for bends or fatigue that could affect the new unit.
- Label low-voltage wires for wall controls and sensors to simplify reconnection later.
- Verify parts in the box: rail sections, trolley, belt or chain, hardware, sensors, wall control, and door arm.
Pro tip: Check header and ceiling backing for solid wood that will support the motor. Follow the manufacturer torque specs and wire routing to protect the warranty.
We stage fasteners and tools within reach and can handle full prep and installation. Call (407) 788-1229 any time for turnkey service with parts and labor guaranteed.
how to replace a garage door opener
We walk through each critical installation step so your new unit works safely from day one.
First, cut power at the breaker and unplug the old garage door opener. Loosen motor brackets, lower the motor, and remove the header bracket. We protect panels and hardware as we work.
-
Prepare the area and disconnect the old unit
Clear the track area and set tools nearby. Label low‑voltage wires and remove the trolley carefully.
-
Install the rail and trolley
Assemble rail sections, slide the carriage, and route the belt or chain. Set preliminary tension per the manual.
-
Mount the motor and attach the arm
Lift the motor onto solid ceiling backing and fasten above 7 feet for clearance. Connect the header bracket and the lifting arm to the door.
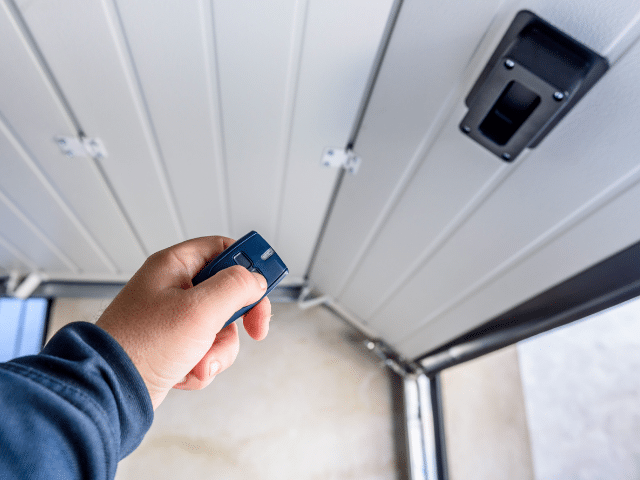
Mount sensors at least 6 inches above the floor, align lenses, and run wiring neatly along framing. Place wall control five feet high and hang the manual release rope near six feet.
- Perform a manual balance check with power off; do not adjust torsion springs if it fails.
- Tension belt or chain to manufacturer specs, then verify all fasteners and parts before powering up.
We can complete these steps for you, start to finish, with guaranteed workmanship. Call (407) 788-1229 for 24/7/365 service in Central Florida.
Programming, Testing, and Fine-Tuning for Safe Operation
We finish every job with repeatable tests that confirm safety and reliable operation.

Balance check and manual release verification. We verify manual balance before powering the unit. We test the emergency release so you can disengage the new opener during an outage.
Programming remotes and smart connections. We program each door opener remote, pair the keypad, and connect app control. We document paired devices and note manufacturer settings for future reference.
Sensor test and stop-and-reverse confirmation. We run the beam test and open close cycles multiple times. Flashing lights usually mean misalignment or obstruction. We adjust sensors until stop-and-reverse works every time.
- Set travel limits and force so the door opens fully and does not slam when it closes.
- Listen for motor vibration and rail noise; tighten hardware and set belt or chain tension.
- Troubleshoot no-response issues by checking power, lock modes, and learn buttons.
Final steps. We show you monthly test steps and leave a simple checklist. If anything needs adjustment, we guarantee parts and labor and are available 24/7/365 at (407) 788-1229.
Maintenance Tips and Upgrade Ideas to Extend Opener Life
Planned upkeep will keep your system quiet, secure, and dependable for years. Simple routine checks and targeted upgrades protect investment and reduce emergency calls.
Lubrication points and periodic safety checks
Lubricate hinges and roller axles twice a year. This reduces squeaks and friction. Avoid greasing the track; that attracts dirt and causes binding.
Each month, run a quick safety check. Test stop-and-reverse, inspect sensor lenses, and verify the manual release. Tighten loose hardware and check belt or chain tension per the manual.
Helpful add-ons: battery backup, motion lighting, parking assist
- Battery backup: An important option during storm seasons. It keeps the garage door opener working when power fails.
- Motion lights and timer-to-close improve safety and convenience, especially when your hands are full.
- Parking assist indicators protect walls and storage and make daily parking precise.
- We can upgrade controls for better range and add a fresh door opener remote or app alerts for peace of mind.
We evaluate models and drive types — belt drive, chain, or direct drive — if you are replacing garage equipment during a renovation. We offer scheduled maintenance plans with guaranteed parts and labor.
Contact Emerald Garage Door Services at (407) 788-1229 for a plan that fits your home and use. We keep your new garage door system safe and smooth with minimal downtime.
Professional Help in Central Florida: Emerald Garage Door Services
When an opener fails, prompt professional care preserves safety and restores daily routine quickly. We are a family-owned company founded by James Balfe and serving Orlando and surrounding areas.

We respond 24/7/365 for emergencies and scheduled work. Our licensed, insured, and bonded technicians are background-checked and skilled in repair, replacement, and maintenance for home systems.
Professional installations follow a six-step flow: preparation, rails, motor mounting, sensor alignment, keypad and remote programming, and testing. Misalignment often causes closing failures and flashing indicators; pros correct this quickly.
- Same-day service when possible and full haul-away of old garage equipment.
- Complete work from motor and rail to sensors and wall controls with guaranteed parts and labor.
- We teach remotes, keypad, and app use and document codes and settings for your records.
- Follow-up maintenance plans keep your system safe and reliable over time.
Call (407) 788-1229 or email EmeraldGarageDoorServices@gmail.com. We provide fast, fair quotes and stand behind every job with an unparalleled guarantee from our family team.
Conclusion
Precision and routine checks turn a new unit into lasting value.
When you install a garage door opener, full preparation matters. A complete replacement includes prep, rail and motor setup, sensor alignment, control programming, and final testing.
Choose models that match weight and power. Verify manufacturer instructions, align sensors carefully, and confirm safe stop-and-reverse before regular use.
Keep periodic checks, swap remote batteries, and consider upgrades like app control or timer-to-close for extra security. If you prefer professional care, our licensed, insured team will install the unit, program the new opener, and verify every safety function.
We back parts and labor with a guarantee. Call (407) 788-1229 or email EmeraldGarageDoorServices@gmail.com anytime.
FAQ
What safety steps should we take before starting this opener replacement project?
Cut power at the breaker, disconnect the unit from the wall control, and engage the manual release. Clear the workspace and wear eye protection and gloves. Keep bystanders, children, and pets away. If you detect frayed wires, damaged springs, or structural issues, stop and call Emerald Garage Door Services.
Which drive type works best for a home in Orlando — chain, belt, or direct drive?
Chain drives are cost-effective and durable but noisier. Belt drives run quietly and suit attached garages. Direct (screw) drives have fewer moving parts and last long. Choose based on noise tolerance, budget, and door weight. We can recommend models that handle Florida humidity and frequent use.
How do we match horsepower to our door’s weight?
Lighter single doors generally use 1/3 HP. Heavier single or lighter double doors often need 1/2 HP. Large or insulated doors typically require 3/4 HP or higher. When in doubt, pick slightly more power for longevity and smoother operation.
What tools and parts should we have on hand before starting?
Gather a drill with driver bits, adjustable wrenches, socket set, ladder, level, tape measure, wire strippers, and safety gear. Keep the new rail, trolley/carriage, mounting brackets, hardware, sensors, and matching remotes or keypad ready. Have the manufacturer instructions accessible.
What are the key steps when removing the old unit?
Disconnect power and wall controls, release the trolley with the manual release, unbolt the header bracket and motor, and support the rail while removing. Label wires and keep hardware organized. Do not attempt spring repairs; those are hazardous.
How do we mount the new motor and rail safely?
Assemble the rail per the manual, lift and secure the motor to the ceiling with the correct bracket, and attach the rail to the motor and header bracket. Verify clearance from the ceiling and obstructions. Use a second person for lifting and final alignment.
Where should safety sensors be installed and how should we align them?
Mount sensors on each side of the door 4–6 inches above the floor, directly facing each other. Keep lenses clean and free of obstructions. After wiring, test the sensors by placing an object in the path to confirm the door reverses on contact.
What wiring and control connections do we need to finish?
Run low-voltage wires from the motor to the wall control and sensors. Secure wiring along rafters and through conduit if required. Connect keypad or smart module per manufacturer instructions and ensure proper grounding of the unit.
How should we set belt or chain tension and travel limits?
Adjust tension per the manufacturer guide so the belt or chain has slight sag but is not loose. Set up travel limits so the door fully closes and opens without slamming. Run several test cycles and fine-tune until the door operates smoothly.
How do we program remotes, keypads, and smart features?
Follow the opener’s programming sequence to add remotes and keypads, usually involving pressing the learn button then activating the remote. For Wi‑Fi or app features, connect the unit to your home network and follow the app prompts. Test each control after pairing.
What tests confirm the opener is safe and balanced?
Perform a balance check by disconnecting the opener and moving the door manually; it should stay open about three to four feet above the floor. Use the manual release to verify smooth operation. Test auto-reverse by placing a 2×4 on the floor and ensuring the door reverses on contact.
What common problems might we encounter during installation and how can we troubleshoot?
No response often means a power or wiring issue. Flashing lights can indicate sensor misalignment or safety circuit faults. Excessive noise may signal loose hardware or improper mounting. Tighten connections, recheck wiring, and consult the manual for error codes. Call Emerald Garage Door Services for persistent faults.
What maintenance keeps the new unit reliable over years of use?
Lubricate rollers, hinges, and bearings annually with manufacturer‑approved lubricants. Test sensors and balance every six months. Replace worn parts like remotes or backup batteries as needed. Regular checks extend service life and keep performance consistent.
Which upgrades are worth considering during a replacement?
Consider battery backup for power outages, Wi‑Fi connectivity for smartphone control, motion lighting, and secure rolling-code remotes. These features improve convenience, safety, and reliability, especially in high-use households.
When should we choose professional installation over DIY?
Hire professionals if the project involves torsion spring work, structural repairs, complex wiring, or if you lack proper tools and help. We recommend professional help for balanced safety and warranty compliance. Emerald Garage Door Services offers licensed, insured technicians in Central Florida.
How can we contact Emerald Garage Door Services for help or emergency service?
Call (407) 788-1229 or email EmeraldGarageDoorServices@gmail.com for 24/7 support. Our licensed, insured, and background-checked team provides guaranteed parts and labor across Orlando and nearby areas.