Even wondered How to Program a Garage Door Opener? or Curious why many homeowners still worry about setting up their access control and expect costly visits?
We answer that with a clear, safe plan you can trust. We are Emerald Garage Door Services, a family-owned, licensed, insured, and bonded company serving Central Florida. Our team brings expert care and 24/7 support so you never feel stuck.
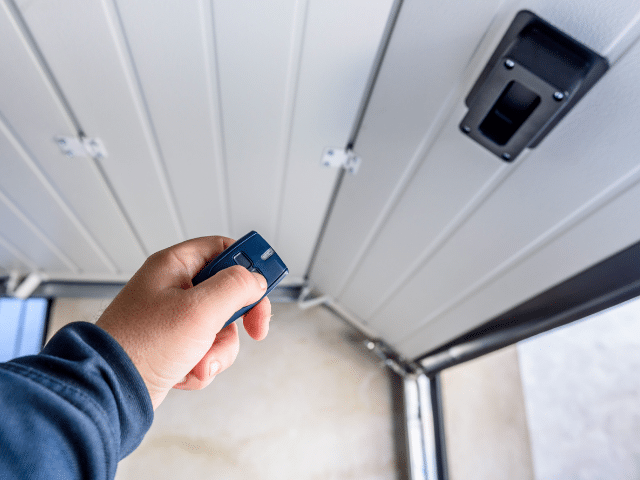
We share easy instructions that work with most modern systems. Find the Learn or Program button on the motor unit, press it, then press the remote button within the LED window. The unit will confirm with a flash or click. Test from a safe distance and repeat for each remote.
For same-day help, model-specific adjustments, or full installation with smart features, call (407) 788-1229 or email EmeraldGarageDoorServices@gmail.com. Every visit is backed by our guarantee and performed by background-checked technicians who treat your home with care.
Key Takeaways
- We provide a concise guide that removes guesswork and boosts safety.
- Look for the Learn button, act within the LED window, and confirm the flash or click.
- Test controls from a safe distance and repeat for each remote.
- Our expert team offers 24/7 support, same-day service, and full installations.
- All work is guaranteed and handled by background-checked technicians.
Before You Start: Tools, Safety, and What to Expect in 2025
Start by staging your gear and making sure the work area is safe and well lit. We encourage preparation and clear instructions before any programming. As a licensed, insured, and bonded family business, we put safety first.
What you’ll need:
- Stable ladder, your opener’s manual, remote, keypad, fresh batteries, and flashlight.
- Confirm the wall control has power and keep people and pets out of the garage.
- Position the ladder under the motor unit for steady access and three points of contact.
Many units hide the Learn button near the antenna or behind the light lens. When you press the button, the indicator light or LED will blink. You generally have about 30 seconds or within seconds to complete the next step.
2025 systems often use rolling code security and show specific light patterns during pairing. Check batteries first to avoid weak signals that force repeat attempts.
Prefer we handle everything? We offer 24/7/365 support and can manage the entire setup with guaranteed work. Call (407) 788-1229 or email EmeraldGarageDoorServices@gmail.com.
How to Program a Garage Door Opener
Follow these clear steps at the motor unit to pair remotes safely and quickly.

Find the Learn or Program button on the opener motor unit. Remove the light lens or small panel if needed. The button sits near the antenna wire and may be behind the cover.
- Activate programming mode: Press and release the Learn button on the motor. The indicator light will come on or blink.
- Act within seconds: Within about 30 seconds, press and hold the chosen remote button until the opener motor’s light flashes or you hear clicks.
- Confirm pairing: Test from a safe position outside the travel path. The door should move when you press the programmed remote.
If the unit exits programming mode too soon, press release Learn again and repeat the step. For more remotes, repeat the same sequence for each remote control so every vehicle and household member has working access.
Prefer professional help? Call (407) 788-1229 and we will schedule a technician to reprogram or add devices. All work is guaranteed.
Program Keypads and In‑Car Systems (HomeLink/Car2U)
Set up keypads and in‑car systems with confident steps that keep your family safe and access reliable. We show secure keypad setup and vehicle syncing in clear, tested steps.
Keypad setup: Press and release the opener’s Learn button on the motor unit to enter programming mode. On the keypad, enter a four‑digit PIN and press and hold Enter until the motor light blinks. Test immediately by entering the PIN and pressing Enter again. Repeat the steps to change the code later.

HomeLink and Car2U pairing
Clear old vehicle codes by holding the two outer in‑car buttons for about 10–20 seconds until the indicator changes. Hold the garage remote 1–3 inches from the vehicle panel, then press and hold both the remote button and the chosen car button until the vehicle indicator flashes rapidly.
- Press and release the Learn button at the opener motor.
- Within seconds, press the vehicle button for two seconds and release; repeat this press‑release cycle up to three times until the door moves.
- Keep the vehicle outside the garage and verify rolling code compatibility; some older systems need a bridge.
- Choose a secure PIN that family members can remember but others cannot guess.
- Label which in‑car buttons control which opener for clarity.
- Prefer professional help? Call (407) 788-1229 or email EmeraldGarageDoorServices@gmail.com for 24/7 support.
Troubleshooting, Common Mistakes, and When to Call Our 24/7 Team
Many pairing errors come down to timing, batteries, or nearby interference. We guide you through quick checks that solve most issues. If a simple fix won’t work, our expert team is ready 24/7.
Common fixes:
- Missed the ~30‑second window after pressing Learn? Press release the Learn button and repeat the step promptly.
- A long press hold on Learn (about 6–10 seconds) can erase every paired device. Avoid holding it that long unless you want a full reset.
- Replace weak remote batteries before pairing. Weak cells cause intermittent signals and repeat attempts.
Signal and indicator checks:
Turn off nearby Wi‑Fi routers, LED shop lights, baby monitors, or cordless phones while you try again. Move the vehicle or remote closer and watch the motor light or indicator for flashes or clicks.

If problems persist, call us any time at (407) 788-1229 or email EmeraldGarageDoorServices@gmail.com. We’re licensed, insured, and bonded. Every technician passes a background check. We guarantee parts, labor, and your satisfaction.
Conclusion
Most successful pairings take under half a minute and end with a visible flash or an audible click at the motor unit. That confirms the remote or vehicle panel is linked and ready.
Quick recap: tap Learn, act within the LED window, then test from a safe spot. Replace weak batteries and avoid interference if pairing fails. Do not hold Learn long or you may erase every device.
Label each button and note keypad PINs in a secure place. If the motor hesitates, the light flickers, or the unit strains, schedule maintenance.
We stand behind every service call with an unparalleled guarantee. For fast Central Florida help call (407) 788-1229 or email EmeraldGarageDoorServices@gmail.com. We’re family‑owned, licensed, insured, bonded, background‑checked, and available 24/7/365.
FAQ
Emerald Garage Door Services: How to Program a Garage Door Opener?
We guide homeowners and businesses in Orlando, FL through the full setup. Locate the Learn or Program button on the opener motor unit. Put the unit into programming mode, watch the indicator light, then press and hold your remote control button within 30 seconds. A light flash or click confirms pairing. Test the remote from a safe distance. If you prefer, our team can complete the setup for you.
Before You Start: What tools and supplies should I gather?
Gather a stable ladder, the opener manual, the remote control and any keypads, fresh batteries, and a flashlight. Keep the garage clear and have a phone handy in case you need our 24/7 support from Emerald Garage Door Services.
Safety first: What precautions are essential?
Use a stable ladder and position it on level ground. Clear the doorway and keep people and pets away while you work. Disable automatic closing features if you need to test travel. If you’re unsure, contact our licensed technicians for a safe service call.
Where is the Learn or Program button on the opener motor unit?
The button is usually on the back or side of the motor housing, near the antenna wire. It may be labeled Learn, Program, or have a small LED next to it. Consult the manual if it’s hard to find; we also provide step-by-step assistance for common brands.
What does activating programming mode involve?
Press the Learn or Program button briefly. The indicator light will blink or change color to show the unit is ready. You then have about 30 seconds to press the remote button you want to pair. Watch the motor light for a confirmation flash or listen for a click.
How long should I press and hold the remote control button?
Press and hold the remote button until you see the opener’s indicator light flash or hear a click. This often takes just a few seconds. If nothing happens, replace the remote batteries and try again within the 30-second window.
How can I confirm pairing worked?
The opener’s indicator light will flash or you’ll hear a click when pairing succeeds. Test the remote from a safe distance. If the door moves, pairing is complete. If not, repeat the Learn sequence or contact Emerald Garage Door Services for help.
Can I add more remotes and keypads? What’s the process?
Yes. Repeat the Learn sequence for each remote or keypad. For keypads, enter your chosen PIN, press Enter or the keypad’s program button, then press the opener’s Learn button and confirm with the motor light. Each device needs its own pairing cycle.
How do I set up a keypad and choose a secure PIN?
On the keypad, enter a 4- to 8-digit PIN per the manufacturer’s instructions, then press Enter. Press the opener’s Learn button and confirm with the motor’s indicator light. Choose a non‑obvious PIN and store it securely.
How do I pair in-car systems like HomeLink or Car2U?
First, sync the remote to the vehicle per the car’s instructions. Next, press the opener’s Learn button. Then press the vehicle’s programmed button in short cycles until the door moves. If rolling codes are used, follow the vehicle steps until synchronization completes.
What is rolling code sync and how is it done?
Rolling code systems change the code after each use for security. To sync, press the vehicle or keypad button in short bursts after activating Learn on the motor unit. The door will move when sync completes. If sync fails, repeat the sequence or call our technicians.
What common mistakes cause programming failure?
Common errors include missing the 30-second window, holding the Learn button too long, weak remote batteries, and using the wrong button on multi-button remotes. Follow the timing guidelines precisely and replace batteries first if you see no response.
How do I fix signal interference and weak range?
Reduce interference by moving Wi‑Fi routers, LED light fixtures, and baby monitors away from the opener. Replace old antenna wires or reposition them for better reception. For persistent issues, our team can test signal strength and recommend solutions.
When should I call Emerald Garage Door Services for help?
Call us if programming fails after several attempts, if indicators show errors, if travel or safety sensors misbehave, or if you prefer professional installation. We offer 24/7 support in Orlando, FL and the surrounding areas for reliable, safe service.