Curious if a new opener will really make daily life simpler and safer at home? Read this guide and you will learn How to Install a Garage Door Opener.
We are Emerald Garage Door Services, a family-owned team serving Orlando and Central Florida. We install and repair the latest systems, and we back every job with licensing, insurance, and background-checked technicians.
A proper setup boosts convenience, security, and lifespan. Before you start, read the maker’s guide, check door balance with a halfway lift test, and map mounting points and power access.
Our guide previews the seven-step process, key components, timing expectations, and common pitfalls. We recommend pros for complex electrical work or heavy units. If anything feels unsafe, pause and call us.
We’re available 24/7/365. Call (407) 788-1229 or email EmeraldGarageDoorServices@gmail.com for expert help or full services.
Key Takeaways
- Proper setup improves daily operation and home security.
- Preparation includes balance checks and planning mounting and power.
- The seven-step path outlines assembly, mounting, sensors, and testing.
- Expect 4–5 hours for a first-time install; faster with experience.
- Call licensed pros for electrical work or oversized systems.
- We offer 24/7 support, guaranteed parts and labor, and background-checked techs.
Why a Properly Installed Garage Door Opener Matters in Orlando, FL
A precise installation makes your entry quick, quiet, and secure every day. Proper fitting reduces strain on the garage door and helps the unit last longer. It also keeps your home routine steady during Florida heat and sudden storms.
Convenience, security, and longevity:
- Correct alignment and tested sensors improve safety and smooth operation.
- A well-tuned door opener closes firmly, deters unwanted entry, and cuts wear on springs and rollers.
- Quiet, steady movement makes early mornings and late nights more pleasant.
- Proper rail mounting lowers vibration and extends the system’s service life.
About Emerald Garage Door Services:
We are licensed, insured, and bonded. Every technician passes a background check before the first service call. We offer repair, installation, and maintenance across Central Florida.
We guarantee parts and labor and respond 24/7/365. Call (407) 788-1229 or email EmeraldGarageDoorServices@gmail.com for fast, trusted service.
Pre-Install Checks to Make Sure Your Door Is Ready
Before any hardware goes up, check the door’s balance and condition so the job starts safely. We walk through a few simple assessments that protect your investment and keep everyone safe.
Balance test and manual lift assessment
Manually lift the garage door halfway. If it doesn’t stay put, springs may be unbalanced. Do not rely on the opener to compensate for a faulty door.
We recommend inspecting hinges, rollers, and tracks for binding or damage. A smooth-moving door is the foundation for a reliable installation.
When to pause DIY and repair the door first
- Pause the project if the door drops or rises during the halfway test.
- Stop DIY when you find broken springs, frayed cables, bent tracks, or cracked panels.
- Read the manufacturer instructions for your specific model before beginning work.
- Plan mount points and verify a nearby grounded outlet so you don’t improvise power later.
An unbalanced door adds strain on the opener and can cause premature failure or unsafe operation. If you’re unsure, call us any time for 24/7/365 help. We can repair the door and the opener first, ensuring code-compliant, safe installation work.
Tools and Materials for Opener Installation
Gathering the right kit and tools makes the project safer and faster.
Verify your kit includes the motor unit, the rail, either a chain or belt drive, remotes, and all mounting brackets and fasteners. Lay parts out on a clean surface so small items stay organized.
Core tools and fast-access items
- Sturdy ladder, drill and bits, screwdrivers, and wrench set.
- Reliable tape measure and level for straight mounting along the ceiling.
- Extra drill bits, socket set, and electrical tape for neat wiring.
Safety and mounting tips
Wear gloves and protective eyewear while handling metal parts and power tools.
Bring steel angle and blocking lumber when extra support is needed. Test-fit the header mount using the provided hardware or temporary deck screws before final lag-bolt placement. This confirms alignment and clearsances before you fully secure the system.
We provide and install the latest technology openers and guarantee our parts and labor. Call (407) 788-1229 for a professional, fully stocked service visit.
how to install a garage door opener
Follow a clear sequence for rail, bracket, and motor assembly to keep the project safe and reliable.
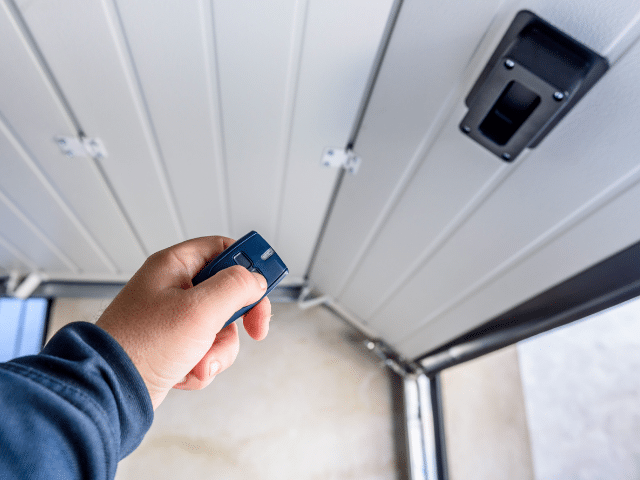
Assemble the rail and connect the motor unit. Slide the trolley into the rail and join the end rail to the motor unit per the manufacturer’s instructions. Choose chain or belt drive as specified and confirm the rail fits the end rail bracket.
Header bracket and alignment. Fasten the header bracket into the wall above the door. Position the rail into the header bracket and use a level for proper alignment before tightening fasteners.

- Mount the motor unit to the ceiling with secure bracing into joists and keep clearances for the unit and light.
- Attach the door bracket centered on the top section and connect the opener arm so movement is smooth through the full travel.
- Install safety sensors low on each side, run wiring neatly along the wall to the head, and connect grounded power at the unit.
Program remotes and set travel and force limits. Watch the first full cycle for any jerks, noise, or drift and make small adjustments. We stand ready to complete any step. Call (407) 788-1229 for licensed, insured, background-checked service 24/7/365.
Safety, Code, and Manufacturer Instructions You Must Follow
A code-compliant setup begins with correct power placement and verified safety features. We ensure every job meets local requirements and the manufacturer’s requirements.
Electrical outlet and wiring: Place the motor unit near a dedicated, grounded outlet. We recommend licensed professionals for any new wiring so power meets code and insurance rules.
Emergency release, sensors, and auto-reverse tests
Attach the emergency release rope to the trolley and set it about 6 feet from the floor so adults can reach it during outages.
Position safety sensors low on each side so they face each other across the opening. Verify indicator lights and alignment before running the system.
- Test auto-reverse with a safe obstruction and adjust force and limit settings per manufacturer instructions.
- Secure covers, protect wires along framing, and keep clear space under the motor unit and around the path.
- We document each safety step so your garage door system meets instructions and local best practices.
We ensure code-compliant installs and verify safety features. Our work is guaranteed and available 24/7/365. Call (407) 788-1229 or email EmeraldGarageDoorServices@gmail.com for certified help.
Common Mistakes DIYers Should Avoid
Small mistakes during setup create big headaches later, especially with moving parts and tensioned springs.
Installing on an unbalanced door is unsafe. It increases wear on the opener and can cause fast failure. Make sure the door passes the halfway lift test before attaching the unit.
Improper rail alignment and loose hardware
Crooked rails cause noisy operation and binding. Use a level for proper alignment and tighten the bracket and rail fasteners securely.
Recheck every fastener after the first test cycle. Vibration often loosens bolts and can increase long-term wear.
Misaligned safety sensors and ignored limit settings
Sensors that don’t face each other lead to intermittent closing problems. Indicator lights help you aim them accurately.
Also verify travel and force limits. Skipping these adjustments can cause hard stops, rail flex, and damage to the system.

- Don’t over-tighten the chain or belt; follow tension specs to avoid noise and bearing stress.
- After setup, listen for rattles and feel for vibration. Inspect the rail for movement during travel.
- When in doubt, we can inspect and correct any DIY issues, backed by our guarantee and 24/7/365 availability.
Troubleshooting After Installation
Post-install checks can reveal simple tweaks that restore smooth, safe movement. We walk through common signs and quick fixes so your system runs reliably.
Door stops, jerks, or rails flex upward—what to adjust
If the door stops or the end rail flexes upward, the travel limits or force settings often need small changes. Adjust limits in short increments so the door closes firmly at the floor and opens fully without strain on the rail.
Noise, vibration, and belt/chain tension fine-tuning
Check belt or chain tension next. Too tight creates noise and bearing wear. Too loose causes slop and uneven movement. Tune per your model’s guidance and then cycle the system several times.
- Symptom identification: Sudden stops, jerks, or end rail flex usually point to limit or force settings.
- Tension check: Balance belt or chain tension for quiet, even operation.
- Fasteners and motor area: Inspect mounting points and the motor for vibration; snug or add bracing as needed.
- Alignment fixes: Small rail level and trolley clearance corrections stop rattles and scraping.
- Confirm stability: Cycle the system several times and recheck fasteners after adjustments.
If the door still hesitates or the opener hums without moving, those signs may indicate deeper mechanical issues. We can diagnose and resolve post-install concerns quickly, day or night. Call (407) 788-1229 for same-day help.
When to Call the Pros for Opener Installation or Repairs
When power or weight raises safety concerns, a pro visit saves time and prevents hazards. We recommend professional service for complex electrical work and heavy or custom doors. That keeps your system safe and code-compliant in Orlando and Central Florida.

Call us for new circuits or outlet placement near the ceiling. Any wiring beyond simple connections should be done by licensed electricians. We ensure power is grounded and meets local code.
- We assess oversized or heavy doors and select the correct unit so the opener isn’t overworked.
- Our crews provide same-day service: removal of old equipment, clean wiring, and sensor setup.
- Fully stocked vehicles bring brackets, fasteners, and specialty tools so your job won’t stall.
We are licensed, insured, bonded, and background-checked. Our technicians prioritize safety, protect your property, and verify performance before we leave. We guarantee parts and labor and remain available 24/7/365.
Call Emerald Garage Door Services at (407) 788-1229 or email EmeraldGarageDoorServices@gmail.com to schedule service or an assessment.
Maintenance Tips to Keep Your Opener Running Smoothly
A short maintenance routine preserves smooth, reliable daily operation. Small checks every season stop small faults from becoming major repairs.
Lubrication, hardware inspections, and sensor checks
Lubricate hinges, rollers, and the drive every few months. This reduces friction and extends part life.
Seasonal hardware checks keep brackets and fasteners tight. Vibration and temperature swings loosen bolts over time.
Test photo sensors monthly. Clean lenses and confirm nothing blocks their view across the opening.
Remote batteries and periodic limit re-tests
Replace remote batteries before they fail so access stays reliable. Re-test travel and force limits several times a year.
If storms or impacts shift alignment, re-check door movement and adjust limits per the manufacturer instructions.
- We follow the correct lubricants and torque specs for your system.
- We offer professional tune-ups, safety inspections, and balance checks.
- We provide maintenance plans and one-time tune-ups, guaranteed and available 24/7/365.
- Call (407) 788-1229 for service in Orlando and Central Florida.
Conclusion
Finish strong with clear checks that protect your family and your investment.
Plan carefully and follow the sequence: test-fit the header, secure lag bolts, and distribute loads with steel angle where needed. Make sure rail alignment, solid ceiling mounting, and neat power and wall wiring are correct for quiet, durable operation.
Follow the manufacturer for final adjustments. Recheck the chain tension, rail motor connections, and travel limits after the first cycles. If any step feels uncertain—limits, attaching hardware, or electrical work—call our team.
Emerald Garage Door Services delivers trusted, guaranteed work across Orlando and Central Florida. We’re licensed, insured, bonded, and on-call 24/7/365. Call (407) 788-1229 or email EmeraldGarageDoorServices@gmail.com for expert door opener installation, repair, or maintenance.
FAQ
Why does a properly installed garage door opener matter in Orlando, FL?
Proper installation improves convenience, boosts security, and extends the system’s life in our humid climate. It prevents premature wear, reduces noise, and helps meet local building codes. Emerald Garage Door Services provides licensed, insured, and bonded technicians available 24/7/365 for reliable service in Orlando and surrounding areas.
How can I tell if my door is ready before starting the project?
Perform a balance test and lift the door manually. It should stay open about three to four feet above the floor. If it falls, binds, or is hard to move, pause and repair springs, rollers, or cables first. An unbalanced door can damage the motor and create a safety hazard.
What essentials come in a typical opener kit?
A standard kit includes the motor unit, rail, chain or belt drive, remote controls, wall console, safety sensors, and mounting hardware. Check the manufacturer parts list before beginning. We use high-quality brands and follow the included instructions.
Which core tools and safety gear do we need?
Gather a drill and drill bits, impact driver or screwdrivers, socket set and wrenches, ladder, level, and tape measure. Wear safety glasses, work gloves, and use blocking or ceiling bracing where needed. Proper tools reduce installation time and risk.
What are the main steps for assembling rail and connecting it to the motor unit?
Lay out rail sections, fasten them per the manual, and attach the trolley or carriage. Align the rail with the header bracket and secure the motor end to the rail. Tighten hardware to the specified torque and verify smooth travel before mounting.
How do we position the header bracket and align the rail correctly?
Locate the center of the door and mark the header above the highest closed panel. Install the header bracket at the correct height, then position the rail so the carriage is centered. Use a level and make small adjustments to prevent binding during movement.
What’s the best method for mounting the motor unit to the ceiling?
Use sturdy ceiling joists or add blocking between joists. Attach the mounting brackets and secure the motor to the braces. Ensure the unit sits level and that vibration isolators are used if recommended by the manufacturer.
How do we attach the door bracket and opener arm for proper movement?
Fasten the door bracket to the appropriate section of the door, usually near the top. Connect the arm to the trolley and the door bracket. Adjust the arm length so the door closes fully without overextending the travel limits.
What’s involved in installing safety sensors, running wiring, and connecting power?
Mount sensors 6 inches above the floor on each side of the door, aligned and facing each other. Run low-voltage wiring to the motor unit and secure it away from moving parts. Connect the motor to a grounded outlet per code and the manufacturer guide.
How do we program remotes and set travel limits?
Follow the operator’s programming steps to add remotes and the wall console. Use the motor unit adjustments to set the open and close travel limits and force settings. Test auto-reverse and obstruction response several times for safety.
Which safety and code items must be followed during installation?
Use a properly grounded outlet near the unit and comply with local electrical codes. Install an emergency release rope and correctly place safety sensors. Perform auto-reverse and photo-eye tests; document settings per manufacturer instructions.
What common mistakes should DIYers avoid?
Do not install an opener on an unbalanced door. Avoid loose hardware, improper rail alignment, and misaligned sensors. Skipping sensor tests or ignoring limit settings often leads to damage or injury.
How do we troubleshoot door stops, jerks, or rails flexing upward?
Check rail alignment and rail brackets for tight attachment. Inspect springs, cables, and roller condition. Adjust travel limits and force settings incrementally. Tighten loose fasteners and replace worn rollers if needed.
What should we do about noise, vibration, or belt/chain tension issues?
Verify belt or chain tension per the manual and adjust tensioners. Lubricate chain components or use a manufacturer-approved belt. Tighten mounting hardware and add vibration isolators if excessive noise persists.
When is it time to call Emerald Garage Door Services for help?
Contact us for complex electrical needs, oversized or heavy doors, or any situation where safety is a concern. We offer technicians who are background-checked and experienced. Call Emerald Garage Door Services at (407) 788-1229 or email EmeraldGarageDoorServices@gmail.com.
What maintenance keeps the opener running smoothly?
Follow a regular lubrication schedule for rollers and hinges, inspect fasteners and cables, and test sensors and limits periodically. Replace remote batteries and re-check travel limits after heavy use or seasonal changes.