Ever looked at a broken garage door spring and thought, “Can I replace my garage door springs myself?” Many homeowners do, thinking about the cost of professional fixes. Replacing garage door springs is a key part of DIY garage door repair and garage door maintenance. But, doing this without the right knowledge and tools is risky.
Garage door springs, like torsion springs or extension springs, balance your garage door’s weight. Some DIY fans might want to try this project. But, it’s important to know how complex and dangerous it can be. Torsion springs, in particular, are very dangerous because they are under a lot of tension.
Key Takeaways
- DIY garage door repair: Weigh the risks versus the benefits.
- Garage door springs are key for balancing your door.
- Torsion springs are more complex and hazardous to replace.
- Understanding the types and function of garage door springs is vital.
- If in doubt about garage door maintenance, seeking professional help is advisable.
Understanding Garage Door Springs
Knowing about garage door springs is key. Garage doors use two main types: torsion springs and extension springs.
Types of Garage Door Springs
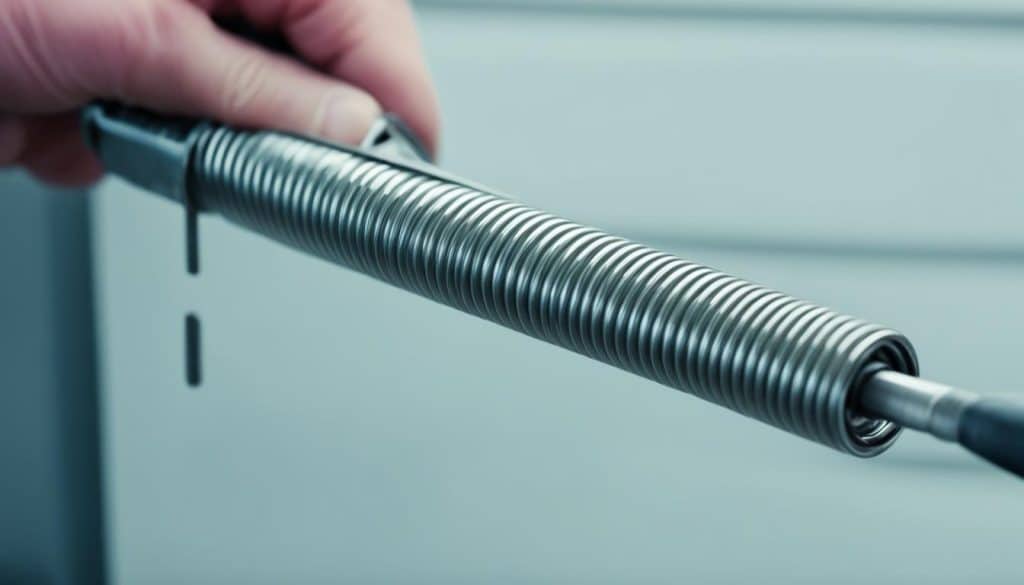
Torsion springs sit above the door and wind up to lift it. They store energy by rotating, making the door move smoothly. These springs are strong and work well with heavy doors.
Extension springs, on the other hand, are on the sides of the door tracks. They stretch and contract to balance the door’s weight. These springs are for lighter doors and are more affordable.
How Garage Door Springs Work
It’s important to know how torsion and extension springs work for DIY repairs. Torsion springs wind up tight to store energy for lifting the door. Extension springs extend along the tracks to help lift the door.
Both types are under a lot of tension. They are key for lifting the door smoothly and safely. Knowing your garage door’s spring type helps choose the right replacement and understand repairs.
The Feasibility of DIY Garage Door Spring Replacement
Replacing garage door springs yourself depends on your confidence and skill with hands-on tasks. If you’re wondering, “Can I replace my garage door springs myself?” think about your past DIY experiences.

If you’ve done DIY projects before, you might think you can handle garage door springs. But, it’s key to know the risks and the spring’s mechanism. DIY garage door spring replacement is complex.
Emerald Garage Door Services advises being honest about your skills before starting. Asking if you can replace your garage door springs yourself is a big question. It involves risks. Always prioritize safety.
Tools Required for DIY Garage Door Spring Replacement
To replace garage door springs yourself, you need the right tools. This makes the job safer and faster. Here are the tools and safety gear you’ll need.
Essential Tools
Your toolkit for garage door spring replacement should have special tools. These tools help you handle the complex job safely and efficiently. Here are the key tools:
- C-clamps: These hold the garage door steady while you work, stopping it from moving.
- Winding bars: Used for torsion springs, these bars help you control the spring’s tension.
- Socket wrench set: This set is great for tightening and loosening bolts and screws on the door.
- Adjustable wrench: It’s handy for adjusting different fasteners without needing many tools.
Safety Gear
Safety is just as important as the tools. Make sure you have the right safety gear:
- Safety gloves: Keep your hands safe from sharp edges and cuts.
- Safety goggles: Protect your eyes from debris and dust.
- Hard hat: Wear it if you’re in a small space or there are dangers above you.
- Sturdy footwear: Wear durable shoes to protect your feet from falling parts.
Having the right tools and safety gear is key for a safe garage door spring replacement. Make sure you have everything before you start. This ensures a safe and efficient job.
Step-by-Step Guide to Replacing Torsion Springs
Replacing torsion springs on your garage door is a task that needs careful steps and safety focus. This step-by-step repair guide will help you through the garage door torsion spring installation. It ensures a smooth and secure result.
Preparation and Safety Measures
Before starting the garage door torsion spring installation, gather all tools and safety gear. Make sure the garage door is closed and the opener is disconnected. This prevents accidents. Wear safety glasses and gloves to protect yourself.
Unwinding the Old Springs
Next, unwind the old torsion springs with a winding bar. Insert the bar into the spring’s winding cone and unwind it slowly. This step is critical to avoid accidents or damage.
Installing New Springs
After removing the old springs, install the new ones. Follow the manufacturer’s instructions. Ensure the springs are wound tightly and evenly on both sides. This is essential for the door’s balance and function.
Testing the Replacement
After installing the new springs, test the garage door. Reconnect the opener and lift the door halfway manually. If it stays in place, the installation is a success. Adjust if needed for smooth operation.
Step-by-Step Guide to Replacing Extension Springs
Replacing extension springs in your garage door requires care and precision. This guide will walk you through the main steps of this process.
Preparation and Safety Measures
Before starting, make sure the garage door won’t close by itself. Turn off the power to the opener and keep the door open with C-clamps or pliers. Also, check your garage door repair manual for specific safety tips for your model.
Removing the Old Springs
To safely take out the old springs, first, disconnect them from the track support. Detach the safety cables and then remove the springs. With the door open, this step is safer and easier.
Installing New Springs
Next, install the new springs. Attach them to the track support and make sure they’re secure. Connect the springs to the pulley system and reattach the safety cables as your manual instructs. It’s important to make sure everything is connected correctly for safety and function.
Testing the Replacement
After putting in the new springs, test the door. Make sure it opens and closes smoothly. If it doesn’t, you might need to fix it again.
Risks and Safety Precautions
Working with garage door springs is risky. They are very tight and can hurt you or damage things. It’s important to know how to stay safe while fixing your garage door.
Use the right tools and wear safety gear. This includes glasses and gloves. Always keep the garage door locked while you work.
Regular checks can help find problems early. This makes your garage door safer and last longer. It also makes it work better.
When to Call a Professional
Fixing garage door problems yourself might save money. But, some jobs are too hard for DIY. Knowing when to call a pro can save you from big mistakes and keep your family safe.
Benefits of Professional Installation
Professional garage door installation has many benefits. Experts can handle complex jobs right the first time. This means fewer problems later on.
Professional services also offer a safety guarantee. This means your family is protected from risks that DIY repairs might have.
Signs You Shouldn’t DIY
Knowing when to avoid DIY repairs is important. If you’re dealing with torsion springs or feel unsure, get professional help. Also, if the job seems too risky, it’s best to call a pro.
Ignoring these signs can lead to serious damage or even danger. This can wipe out any savings from trying to do it yourself.
Conclusion
Replacing garage door springs can be a DIY job, but you need to know a lot and have the right tools. Garage door care is all about paying attention to details and keeping safe. It’s key to understand the mechanics and risks before starting any repair.
Doing it yourself might seem easy and cheap, but think about your skills first. Making mistakes can cause more harm or hurt you. So, it’s important to know if you can handle it.
If you’re not sure or face an emergency, it’s best to call a pro. Companies like Emerald Garage Door Services can fix it right and fast. Choosing a professional ensures your garage door works well and keeps your home safe.

FAQ
Can I replace my garage door springs myself?
Yes, you can replace your garage door springs yourself. But, be careful. The springs are very tight. It’s best to know what you’re doing and have the right tools before you start. If you’re not sure, it’s safer to get help from a pro like Emerald Garage Door Services.
What types of garage door springs are there?
There are two main types of garage door springs. Torsion springs are mounted above the door and help lift it. Extension springs are on the sides and stretch to help lift the door.
How do garage door springs work?
Garage door springs help lift and lower the door by balancing its weight. Torsion springs wind and unwind, while extension springs stretch and recoil. Both are very tight and are key to the door working right.
Is garage door spring replacement feasible as a DIY project?
Replacing garage door springs yourself depends on your skill and confidence. Extension springs are easier to fix yourself. But, torsion springs are more complex and risky. Make sure you can handle it before you start.
What tools are required for DIY garage door spring replacement?
You’ll need C-clamps, winding bars for torsion springs, and safety gear like gloves and goggles. Having the right tools and knowing how to use them is key for a safe fix.
What safety gear should I use when replacing garage door springs?
Always wear protective gear like gloves, goggles, and sturdy clothes when fixing garage door springs. This gear helps prevent injuries during the repair.
What are the preparation and safety measures for replacing torsion springs?
Before replacing torsion springs, lock the garage door and gather all tools and safety gear. Follow detailed steps to unwind the old springs and install new ones safely and correctly.
How do I unwind the old torsion springs?
To unwind old torsion springs, use a winding bar to slowly lower the tension. This step is critical and must be done carefully to avoid injury or damage.
How do I install new torsion springs?
Installing new torsion springs requires following precise steps to wind them correctly. It’s important to follow instructions carefully to ensure they are properly tensioned and balanced.
How do I test the replacement of torsion springs?
After installing new torsion springs, test the garage door’s balance and function. Open and close the door several times to check for smooth operation and proper tension.
What are the preparation and safety measures for replacing extension springs?
To replace extension springs, lock the garage door and gather all tools and protective gear. Carefully remove the old springs, which are less tight when the door is open, before attaching the new ones.
How do I remove the old extension springs?
Remove old extension springs when the door is open to release most of their tension. Then, safely detach the springs from the pulley and safety cable systems.
How do I install new extension springs?
Install new extension springs by attaching them to the pulley and safety cable systems. Follow instructions carefully to ensure proper installation and avoid functionality issues.
How do I test the replacement of extension springs?
Test the replacement of extension springs by opening and closing the garage door to ensure smooth operation. Make sure the door is balanced and the springs function correctly.
What are the risks and safety precautions involved in garage door spring replacement?
Replacing garage door springs can be dangerous. It might lead to injury, damage to property, or a bad installation. To stay safe, use the right tools, wear protective gear, work carefully, and keep the garage door locked during the job.
When should I call a professional for garage door spring replacement?
If you’re not sure you can do it, or if you’re dealing with torsion springs, call a pro. Companies like Emerald Garage Door Services have the skills and tools to do it right and safely.
What are the benefits of professional garage door spring replacement?
Getting a pro to replace your garage door springs is safer and more reliable. They have the skills and tools to do the job right. This means your garage door will work smoothly, without any safety issues.
What are signs that I shouldn’t attempt a DIY garage door spring repair?
If you’re unsure about handling high-tension springs, don’t try it yourself. Not feeling confident or having the right tools is a sign to ask for help. If it looks too complicated, always get a professional.